The general guideline for cleaning optics is “if it’s not dirty, don’t clean it”. Handling optics increases their chances of getting dirty or damaged, so you should clean optics only when necessary. Both the proper cleaning products and proper methods are equally important to cleaning the optic.
There are different methods for cleaning and certain specialized optics require particular attention and change in procedures. Below are general guidelines to be used as a reference only when cleaning optics.
HANDLING NOTE:
Optics should be handled in a clean, low-dust environment while wearing powder-free acetone-impenetrable gloves or finger cots. Gloves are typically preferable as they cover the whole hand. Since oil and debris from your hands or from used lens tissue can stain or damage optical coatings, you should not touch any transmissive or reflective surfaces of your optic and never reuse a lens tissue. In case of contact, fingerprints on a coated surface should be cleaned as soon as possible to minimize the risk of staining or damaging the optic. Consider that lens tissues are inexpensive compared to the price of an optic.
Inspect an optic for dust and stains by holding it near a bright visible-light source. Viewing the optic at different angles allows you to see scattering from dust and stains.
STEP 1. USE A CLEAN-AIR DUSTER
| Dusting your Optic: Wiping a dusty optic with lens tissue is like cleaning your windshield with sandpaper. Always blow the dust off your optic before cleaning it, using an optic bulb blower or compressed air suitable for optics. |
Dust is the most common contaminant and the first step to cleaning your optics should be to use an optic bulb blower or compressed air. The compressed air or nitrogen must be filtered and oil-free, and de-ionized gas is recommended. Commercially available “chemical dusters” such as those designed for electronics or keyboards are typically not recommended, as the propellant can spray and potentially damage the optic.
Wiping a dusty optic is like cleaning your windshield with sandpaper. If the dusted optic has no visible stains after you dust it, then remember: “If it’s not dirty, don’t clean it.” If it’s still not clean, proper use of solvents and lens tissue can often do the trick.
STEP 2: USE SOLVENT AND LENS TISSUE
Always use lint-free tissue with a solvent. Dry lens tissue can scratch optical surfaces. A good solvent to use is a mix of 60% acetone with 40% methanol. Acetone alone dries too quickly to dissolve all of the debris. The methanol slows the evaporation time and also dissolves debris that acetone alone would not clean. Always use acetone-impenetrable gloves when using acetone.
Acetone should never be used to clean plastic optics or optics in plastic housings as this will cause damage to the plastic. Compressed air, isopropyl alcohol, or de-ionized water are safe alternatives. As a note, isopropyl alcohol is an acceptable and effective option, but its relatively slow evaporation can leave drying marks on the optic. De-ionized water (with mild soap) can also be used with plastics.
Clean the edge of the optic before cleaning the face (central area) to prevent dirt from being drawn up onto the face. Wipe slowly to allow the solvent to evaporate without streaking. Remember, slow and steady cleans the optic.
For small, mounted optics:
| The “Brush” Technique: Wipe slowly straight across from one edge of the optic to the other. |
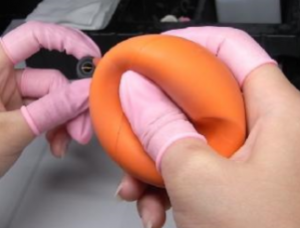
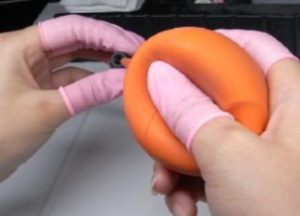
Use the “brush” technique for small or mounted optics. Make a lens-tissue brush by folding the lens tissue so that the fold is nearly as wide as the optic to be cleaned. Do not touch any part of the tissue that will touch the optic. With a hemostat or tweezers, grip the folded tissue parallel to and near the fold. Wet the “brush” with solvent and shake off any excess liquid. Start first by blowing off the dust. Place the brush on the optic surface, apply slight pressure with the hemostat, and slowly wipe straight across, from one edge of the optic surface to another.
For mounted optics, use a smaller “brush” held by hemostats, or an optic tissue wrapped around a low-lint swab. Clean the edges of the exposed optic first, tracing the inside edge of the mount in a slow circle. Be careful to move slowly to allow the solvent to evaporate and prevent leaving streaks or spots. Do not double back over your path. As you approach your starting point trace a decreasing radius circle until you reach the center of the optic. Lift the “brush” slowly to prevent solvent from accumulating at the center.
For large, unmounted optics:
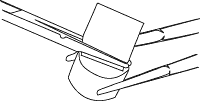
| The “Drop and Drag” Technique: Drop solvent onto your lens tissue and drag the soaked tissue slowly across the lens surface. Remember to clean the edges of your optic before you clean the face. |

The “drop and drag” technique is ideal for light cleaning and large, unmounted optics. Place your optic on a clean, non-abrasive surface, such as a clean-room wiper. After blowing off the dust using compressed air or nitrogen, lay a piece of unfolded lens tissue over the optic, saturate the lens tissue with solvent, and slowly drag the soaked tissue across the lens surface. Similarly, to other methods, moving the tissue slowly allows the solvent to evaporate uniformly without leaving any drying markings. Remember to clean the edges of your optic before you clean the face.
For stubborn stains on durable coatings:
| The “Wipe” Technique: Only use this technique for stubborn stains on more durable coatings. |


This method should be used rarely for intense cleaning of stubborn stains. It is important to note that excessive use of this cleaning technique can cause damage to any transmissive or reflective coatings. Fold the lens tissue as described in the “brush” technique above, and grip it with your fingers instead of the hemostat. Saturate the lens tissue with solvent. Applying a uniform pressure on the optic edge, slowly wipe across the lens surface.
STEP 3: STORE THE CLEANED OPTICS
Once you’ve cleaned your optic, place the optic in the mount it will be used in, or wrap it in lint-free lens tissue and place it in its container right away. Be mindful to wrap each optic in its own lens tissue and/or store it individually, as unwrapped optics that are in contact will cause damage. Keep the optics in a low humidity environment.